Installation instructions for carburetors K68U, K68T
Carburetors with the "T" index are installed on 750 CC engines, and with the "Y" index - 650 CC.
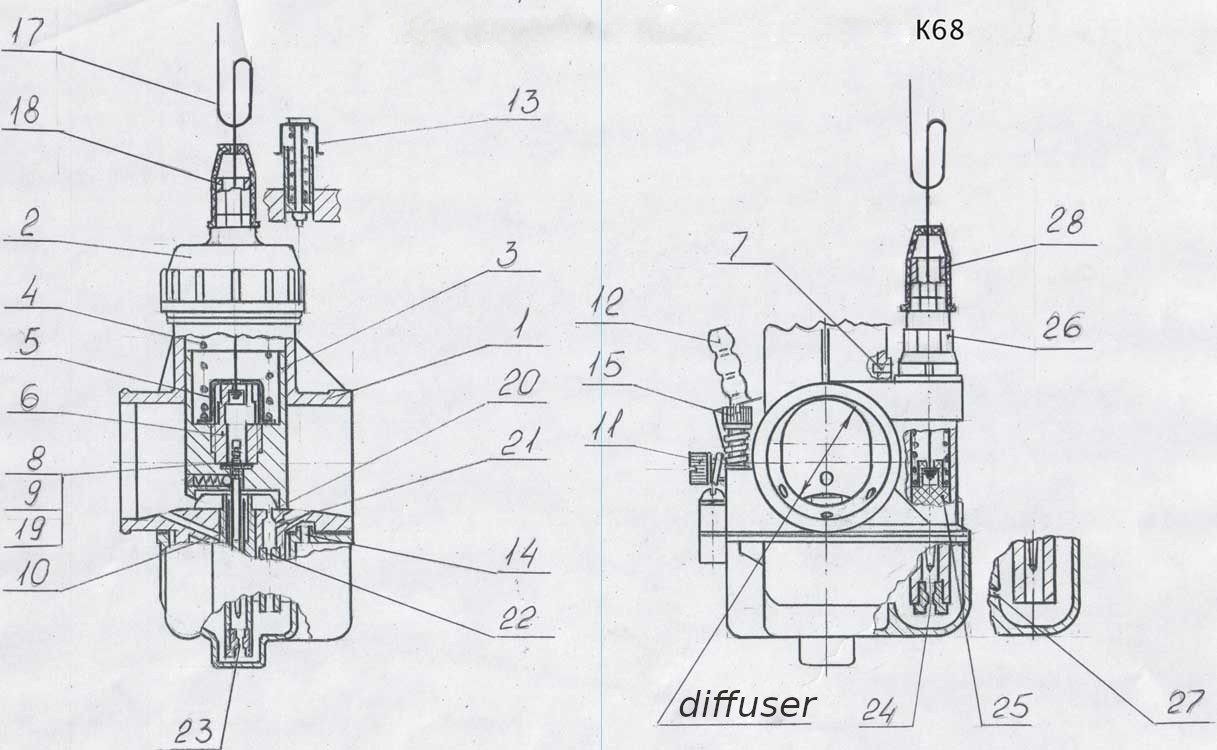
The engine is equipped with 2 carburetors. A carburetor is installed on the left cylinder, in which the throttle lifting screw 11 is located on the side of the fuel nozzle 12 (left version), on the right - the carburetor, in which the screw 11 is located on the side of the starting device.
1. Installing the carburetor on the engine.
The carburetor is installed on the engine in the following sequence:
- Unscrew cover 2, remove it assembled with throttle 3 assembled, disconnect cable blank 17.
- Pass the gas cable through the guide tube 18, spring 4 and stopper 5. Using the stopper 5, squeeze the spring 4 and insert the cable boss into the groove of the coupling 6.
- Install the throttle 3 so that the groove made on its lateral surface slides over the pin 7 pressed into the body 1. Lowering the throttle into the well, direct the needle 8 into the hole of the spray gun 10.
- Screw on the lid.
- Use the throttle to raise and lower the throttle 3. Make sure that it fully opens and closes the diffuser.
- Using the screw 11, raise the throttle 3 so that the distance between its lower edge and the generatrix of the diffuser is 1-2 mm.
- Install the assembled carburetor on the engine through a standard gasket and fasten with nuts, tightening them evenly to avoid deformation of the flange.
- Adjust the position of the cable sheath stop 25 so that the cable sheath has an axial play of 2-3 mm. Close stop 25 with cap 26.
- Screw in the screw 15 completely with a slight effort, and then unscrew it 1 turn.
- Connect the fuel hose to the union 12.
2. Preparing the carburetor for starting the engine.
- After opening the fuel cock, make sure that there is no fuel leaking from the carburetor.
- Open the starter 16.
- To facilitate starting a cold engine at temperatures below + 5 ° C, overfill the float chamber by pressing the damper 13 and holding it until fuel appears from the drain hole 14.
- Turn the engine crankshaft by pressing the kick starter 1-2 times, turning on the ignition.
- After starting and warming up the engine, close the starting device 16.
3. Adjusting the carburetor with a warm engine.
- Before starting the adjustment, it is necessary to check the technical condition of the engine.
- Disconnect one of the cylinders by removing and short-circuiting the spark plug tip to ground.
- Using the throttle lift screw 11, reduce the speed of the operating cylinder to the minimum stable speed.
- Adjust the speed with the mixture quality screw 15 to maximum.
- Repeat this operation 2-3 times, gradually reducing the engine speed. Slowly lifting the throttle, make sure that the engine constantly, without "dips", increases the speed. If a "failure" is observed, it is necessary to enrich the mixture by turning screw 15 by 1 / 4-1 / 3 of a turn.
- Adjust the second carburetor in the same way.
- Switch on both cylinders. Unscrew the throttle lift screws 11 of each carburetor by the same angle, reduce the engine speed to the minimum stable speed.
- Determine by ear the drop in engine speed during short-term alternating cylinder shutdown.
- Using screws 11, adjust the throttle lift so that the engine speed with alternating operation of the right and left cylinders is the same.
- Switch on both cylinders and increase the throttle with the throttle knob and then sharply reduce the engine speed. In this case, the engine should go to the low speed mode and not stall. If the engine stalls, it is necessary to slightly increase the engine speed by tightening the screws 11 of both carburetors at the same angle.
4. Adjustment of the synchronization of the cylinders.
- Ensure free rotation of the rear wheel of the motorcycle.
- Switch on top gear.
- Turning off one of the cylinders, increase the engine speed so that the speedometer shows 40-50 km / h.
- Fix the position of the throttle stick and, without changing it, determine the speedometer reading when the second cylinder is running.
- Adjust the position of the stops of the cable sheath 25 of both carburetors so that the speedometer readings are the same during the alternating operation of each of the cylinders.
5. Adjust the quality of the mixture in the operating modes of the engine, depending on the climatic conditions and the technical condition of the engine, by moving the dosing needle 8 relative to the lock 9.
The nominal position of the lock is the middle groove of the needle. When moving the needle lock up, the mixture becomes leaner, when moving down (towards the conical part of the needle), it is enriched. The displacement of the needle is achieved by repositioning the lock 9 on the nearby groove (coarse adjustment) and repositioning the adjusting washer 19 (fine adjustment).
6. Special instructions for use.
Operation is not allowed if fuel is leaking.
The carburetor must be operated with a factory-fitted hermetically sealed air filter. Changing the design of the filter, as well as installing the filter from other vehicles is not allowed. The fuel entering the carburetor must be free of mechanical impurities. The carburetor parts must be flushed with fuel only. Solvent flushing is not permitted. After rinsing, blow out with compressed air or dry.
Cleaning the calibrated holes 20, 21, as well as the holes of the jets 22, 23, 24 with metal objects (wire, needles, etc.) is not allowed.